ThoughtSpot supports Microsoft Azure Active Directory (AD) OAuth for a Snowflake connection. With Azure AD OAuth, the authorization server generates an access token from Azure AD on behalf of the ThoughtSpot user which authenticates them with Snowflake and authorizes ThoughtSpot to query the database using their Snowflake user account.
Creating an external OAuth token using Azure AD on behalf of the user
Part 1: Creating a Snowflake OAuth resource
To create a Snowflake OAuth resource, do the following:
-
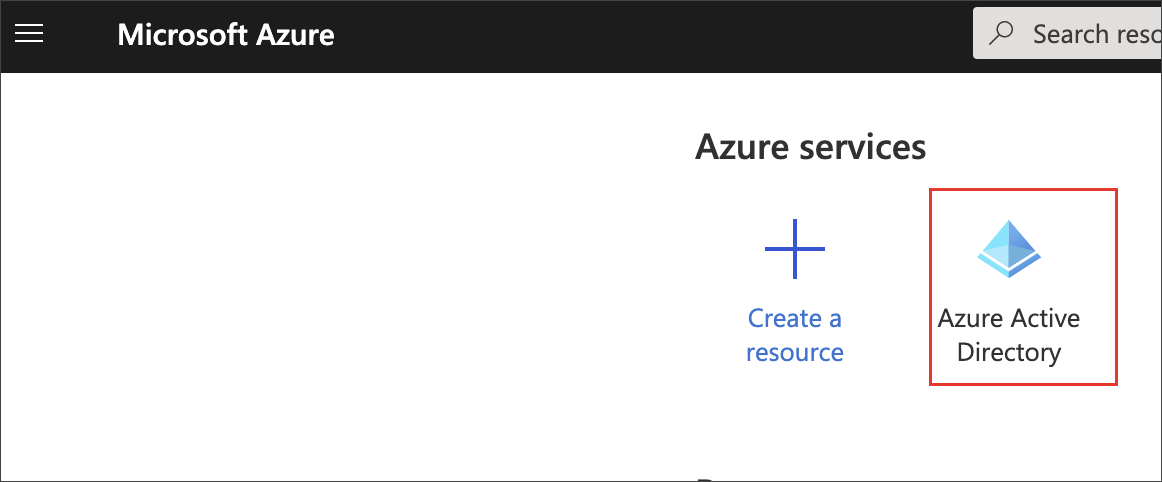
Sign in to the Microsoft Azure Portal.
-
Navigate to Azure Active Directory.
-
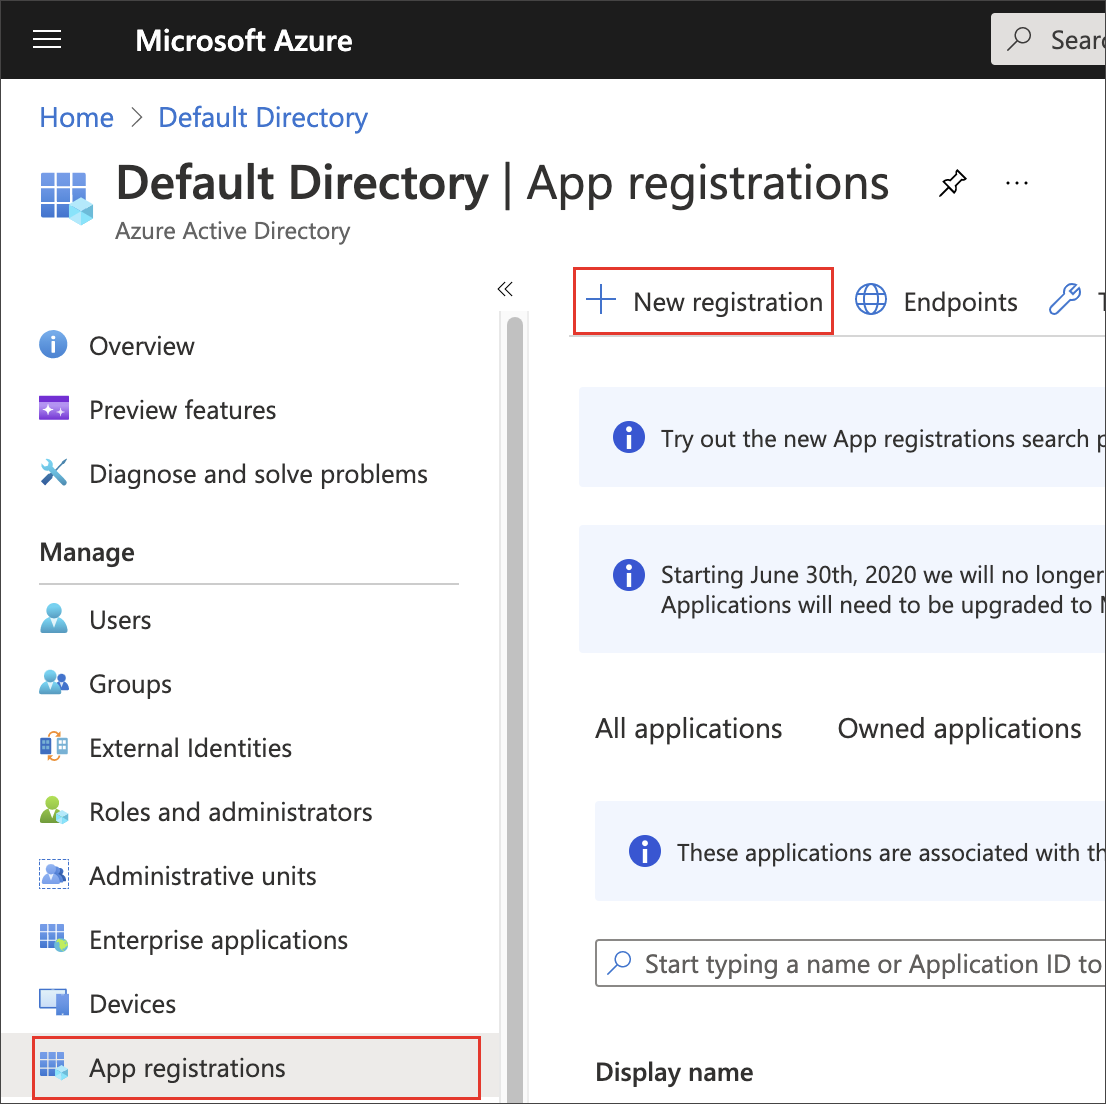
Click App registrations, then New registration.
-
For Name, enter a name for your application.
Example:
Snowflake Oauth User Resource -
Make sure Supported account types is set to Single Tenant.
-
Click Register.

-
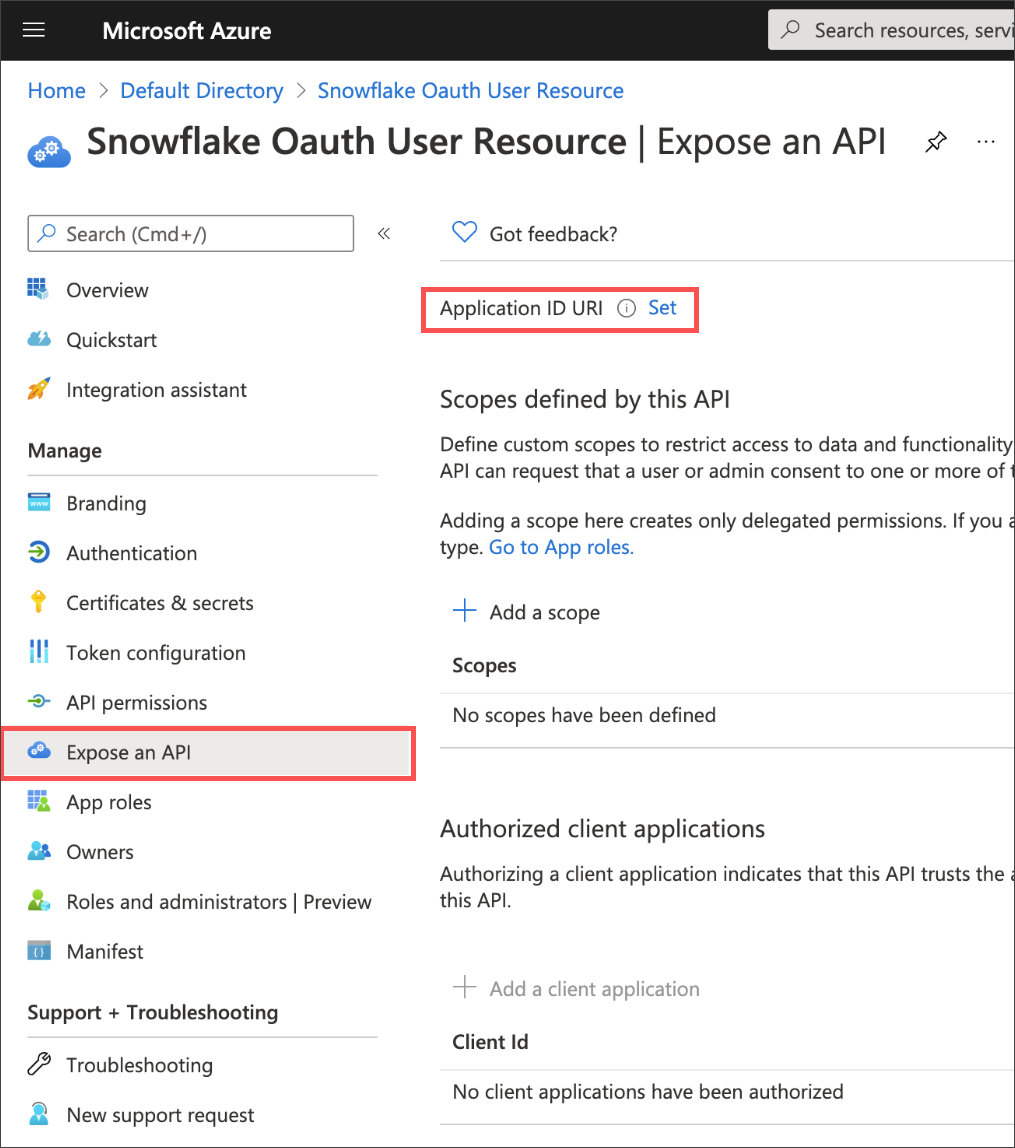
After the application is created, click Expose an API.
-
Next to Application ID URI, click Set and change its value from api://<alphanumeric value> to https://<alphanumeric value> and click Save.
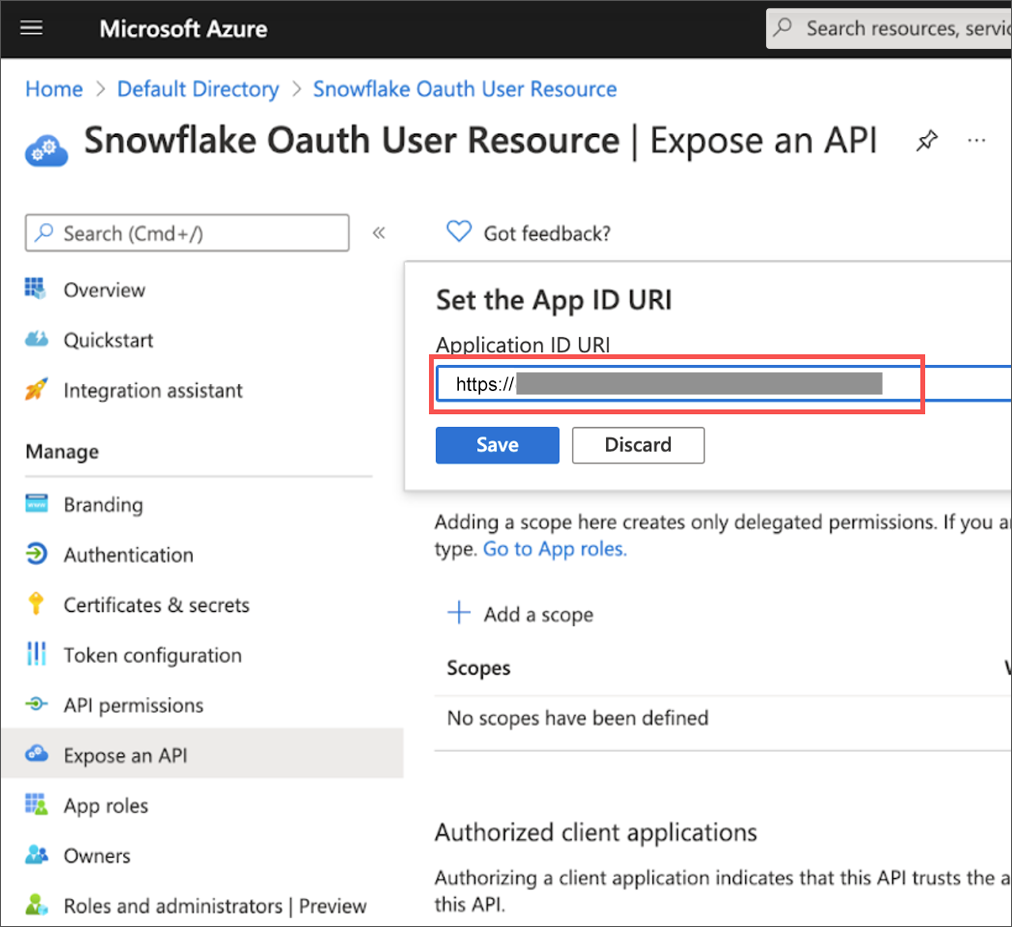 Note: If the Application ID URI is not used, you must create a security integration with audiences using the Snowflake Account URL (i.e.
<account_identifier>.snowflakecomputing.com).Important: The Application ID URI must be unique in your organization’s directory. Example: https://your.company.com/. It should be come from your primary domain. -
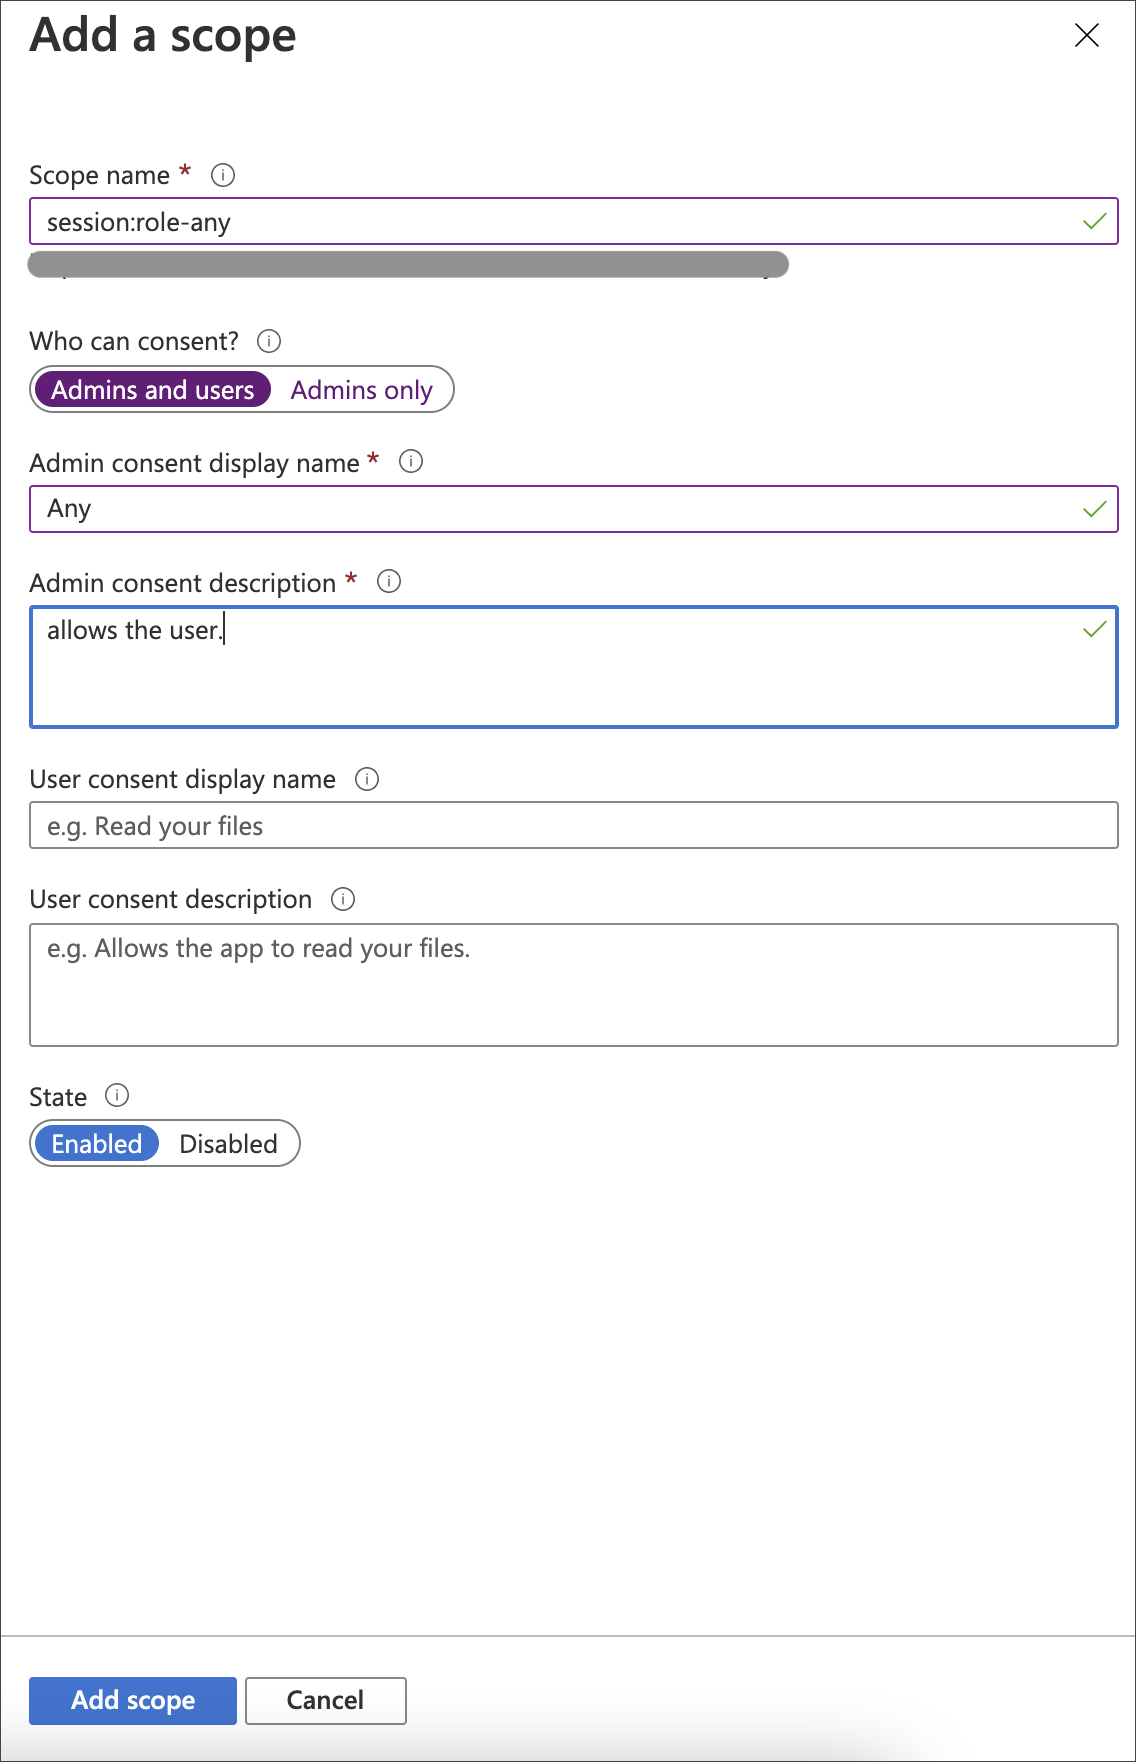
Click Add a scope.
-
For Scope name, enter the name of the Snowflake role (example:
session:role-any). -
Select who can consent.
-
Enter an Admin consent display name (example:
Any). -
Enter an Admin consent description.
-
Click Add Scope.
Part 2: Creating a Snowflake OAuth client app
To create a Snowflake OAuth client app, do the following:
-
Sign in to the Microsoft Azure Portal, and navigate to Azure Active Directory, if needed.
-
Click App registrations, and then click New registration.
-
For Name, enter a name for the client (example:
Snowflake OAuth User). -
For Supported account types, make sure it is set to Single tenant.
-
Click Register.
-
Once the app is created, click Overview.
-
From the Application (client) ID field, copy the ID. This ID is referred to as the
<OAUTH_CLIENT_ID>in the steps that follow.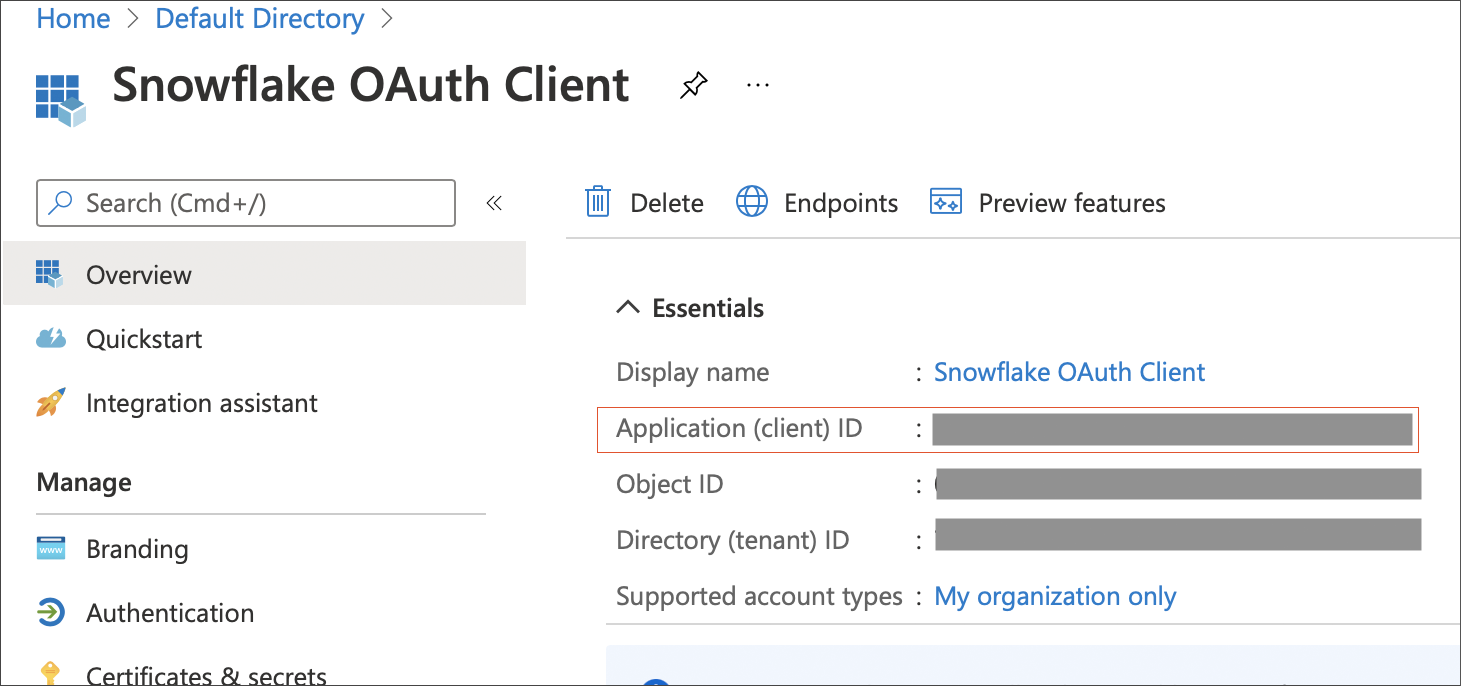
-
Click Authentication, and under Web, specify the redirect URI using the following format:
<https://<public> url of your ThoughtSpot Instance>/callosum/v1/connection/generateTokens
-
Click Certificates & secrets and then New client secret.
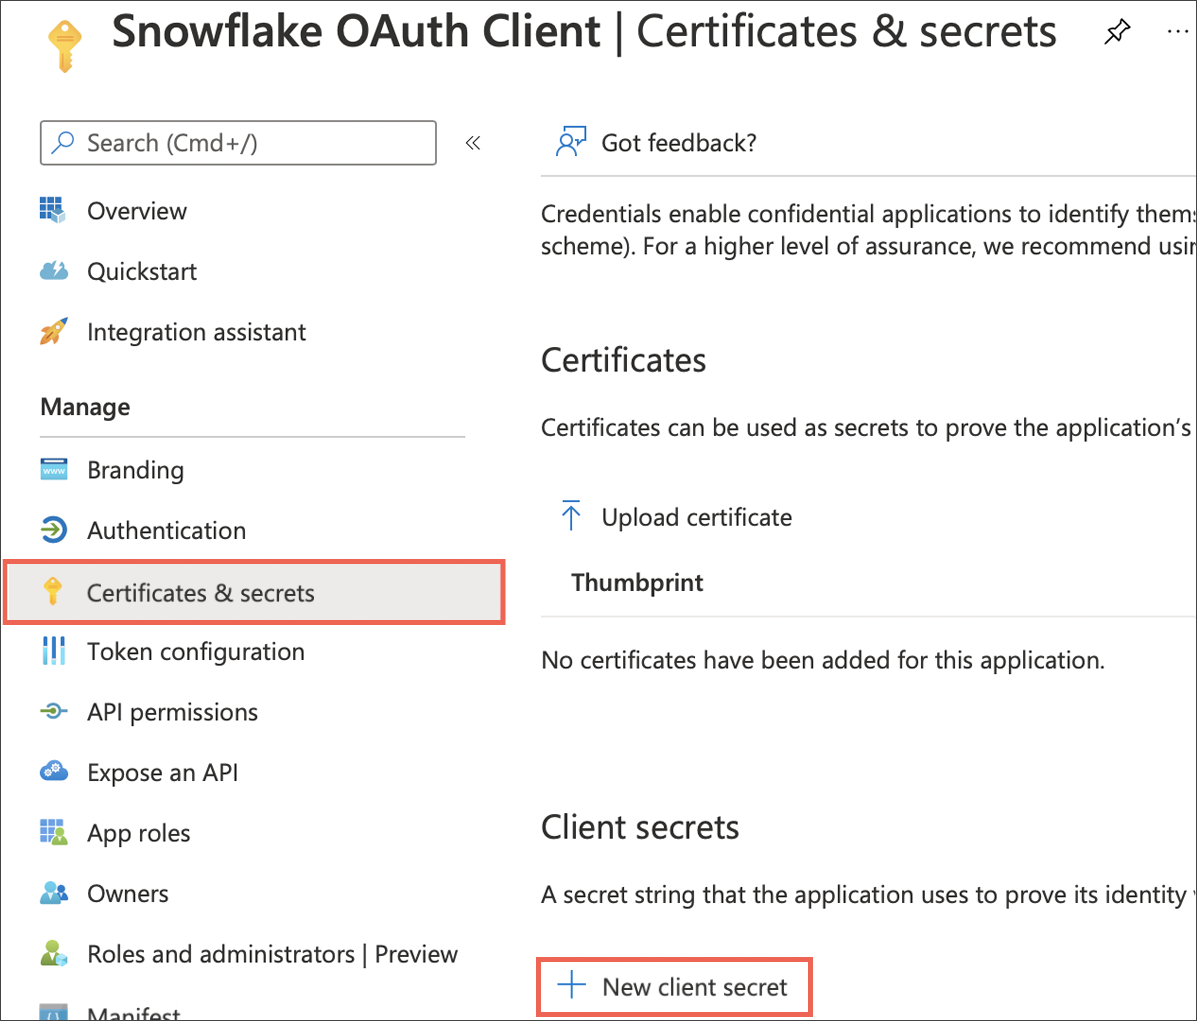
-
Copy the Value of the secret you just created. This is referred to as
<OAUTH_CLIENT_SECRET>in the steps that follow.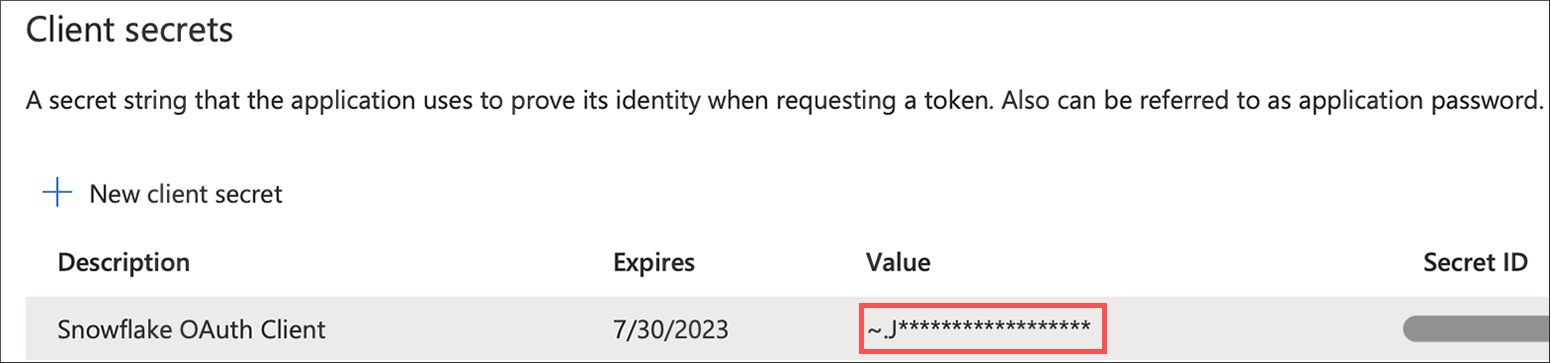
-
Click API permissions, then click Add a permission.
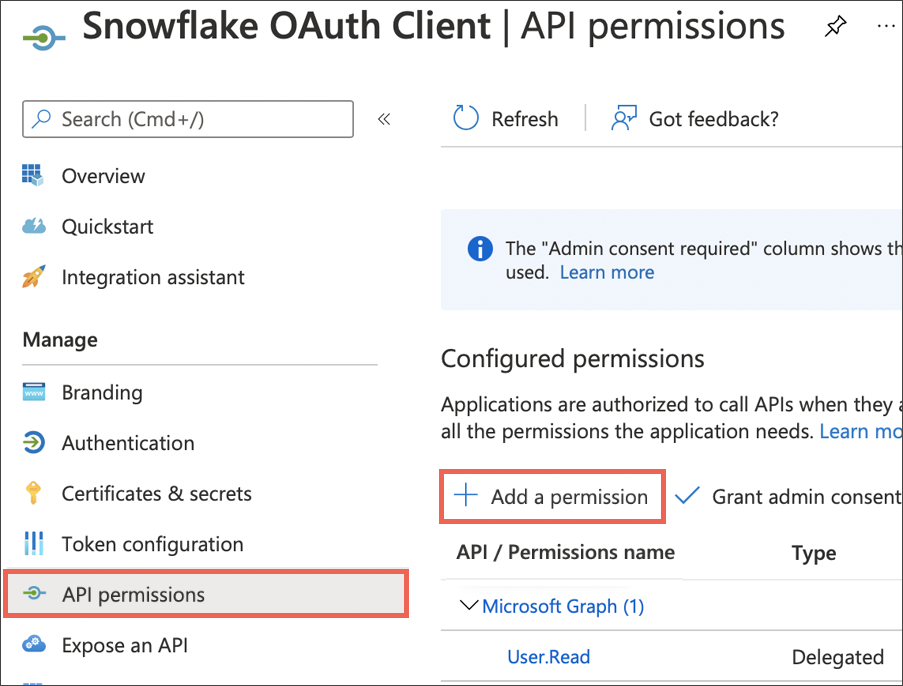
-
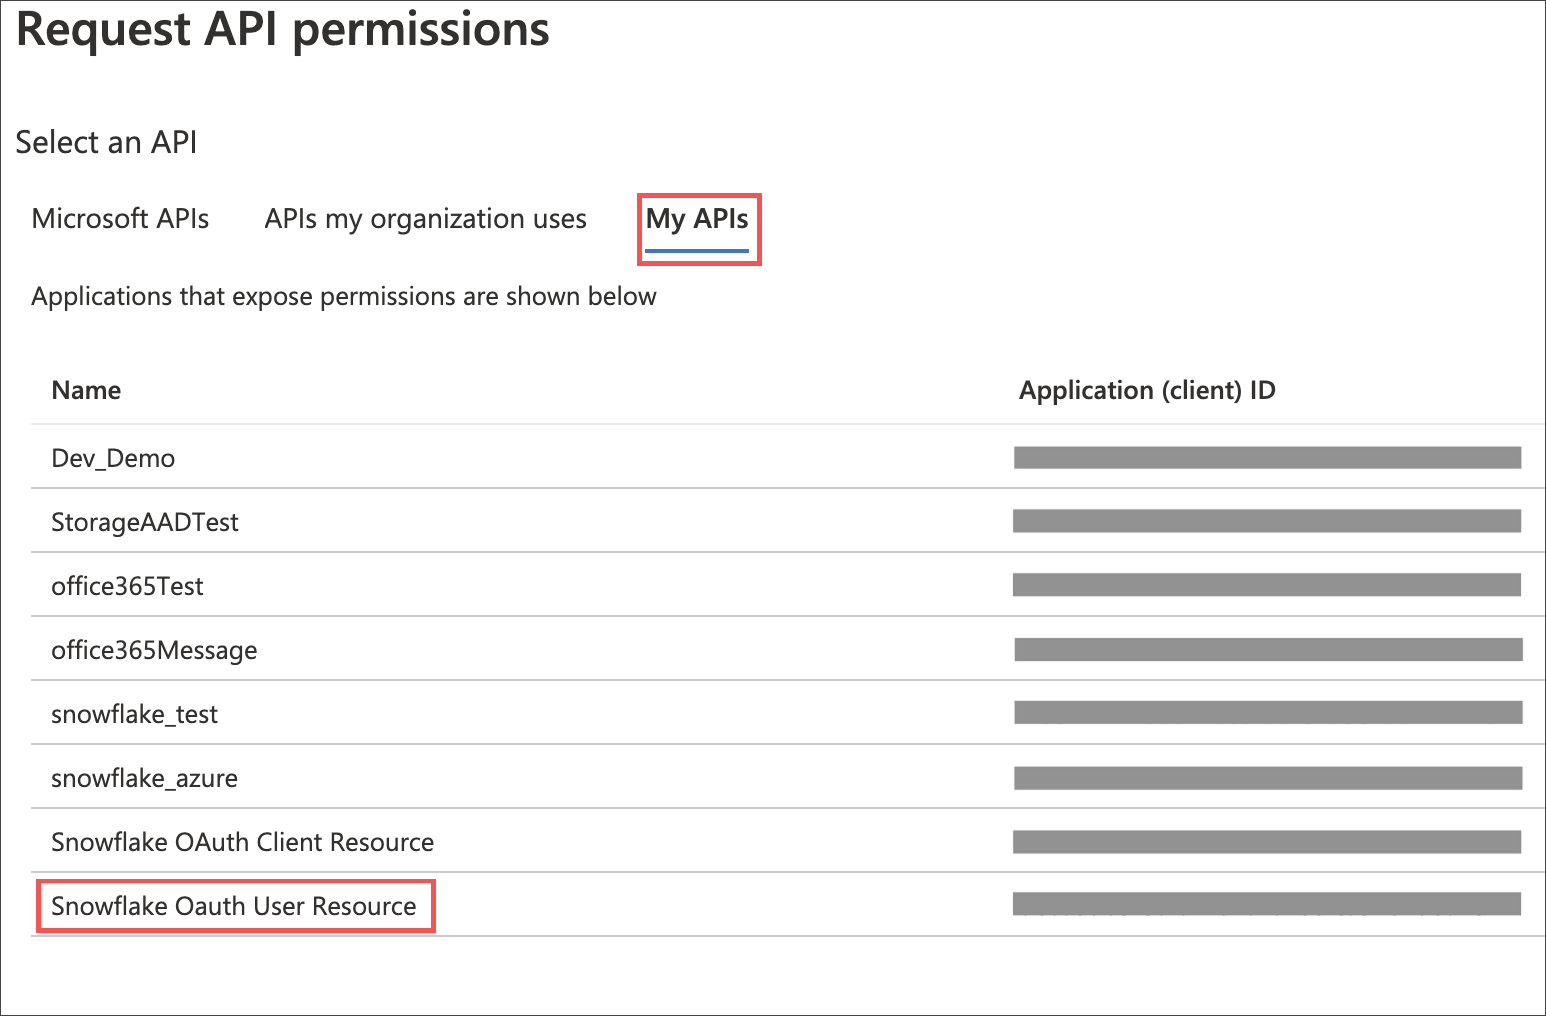
Click My APIs.
-
Click the name of the Snowflake OAuth Resource you created in Part 1.
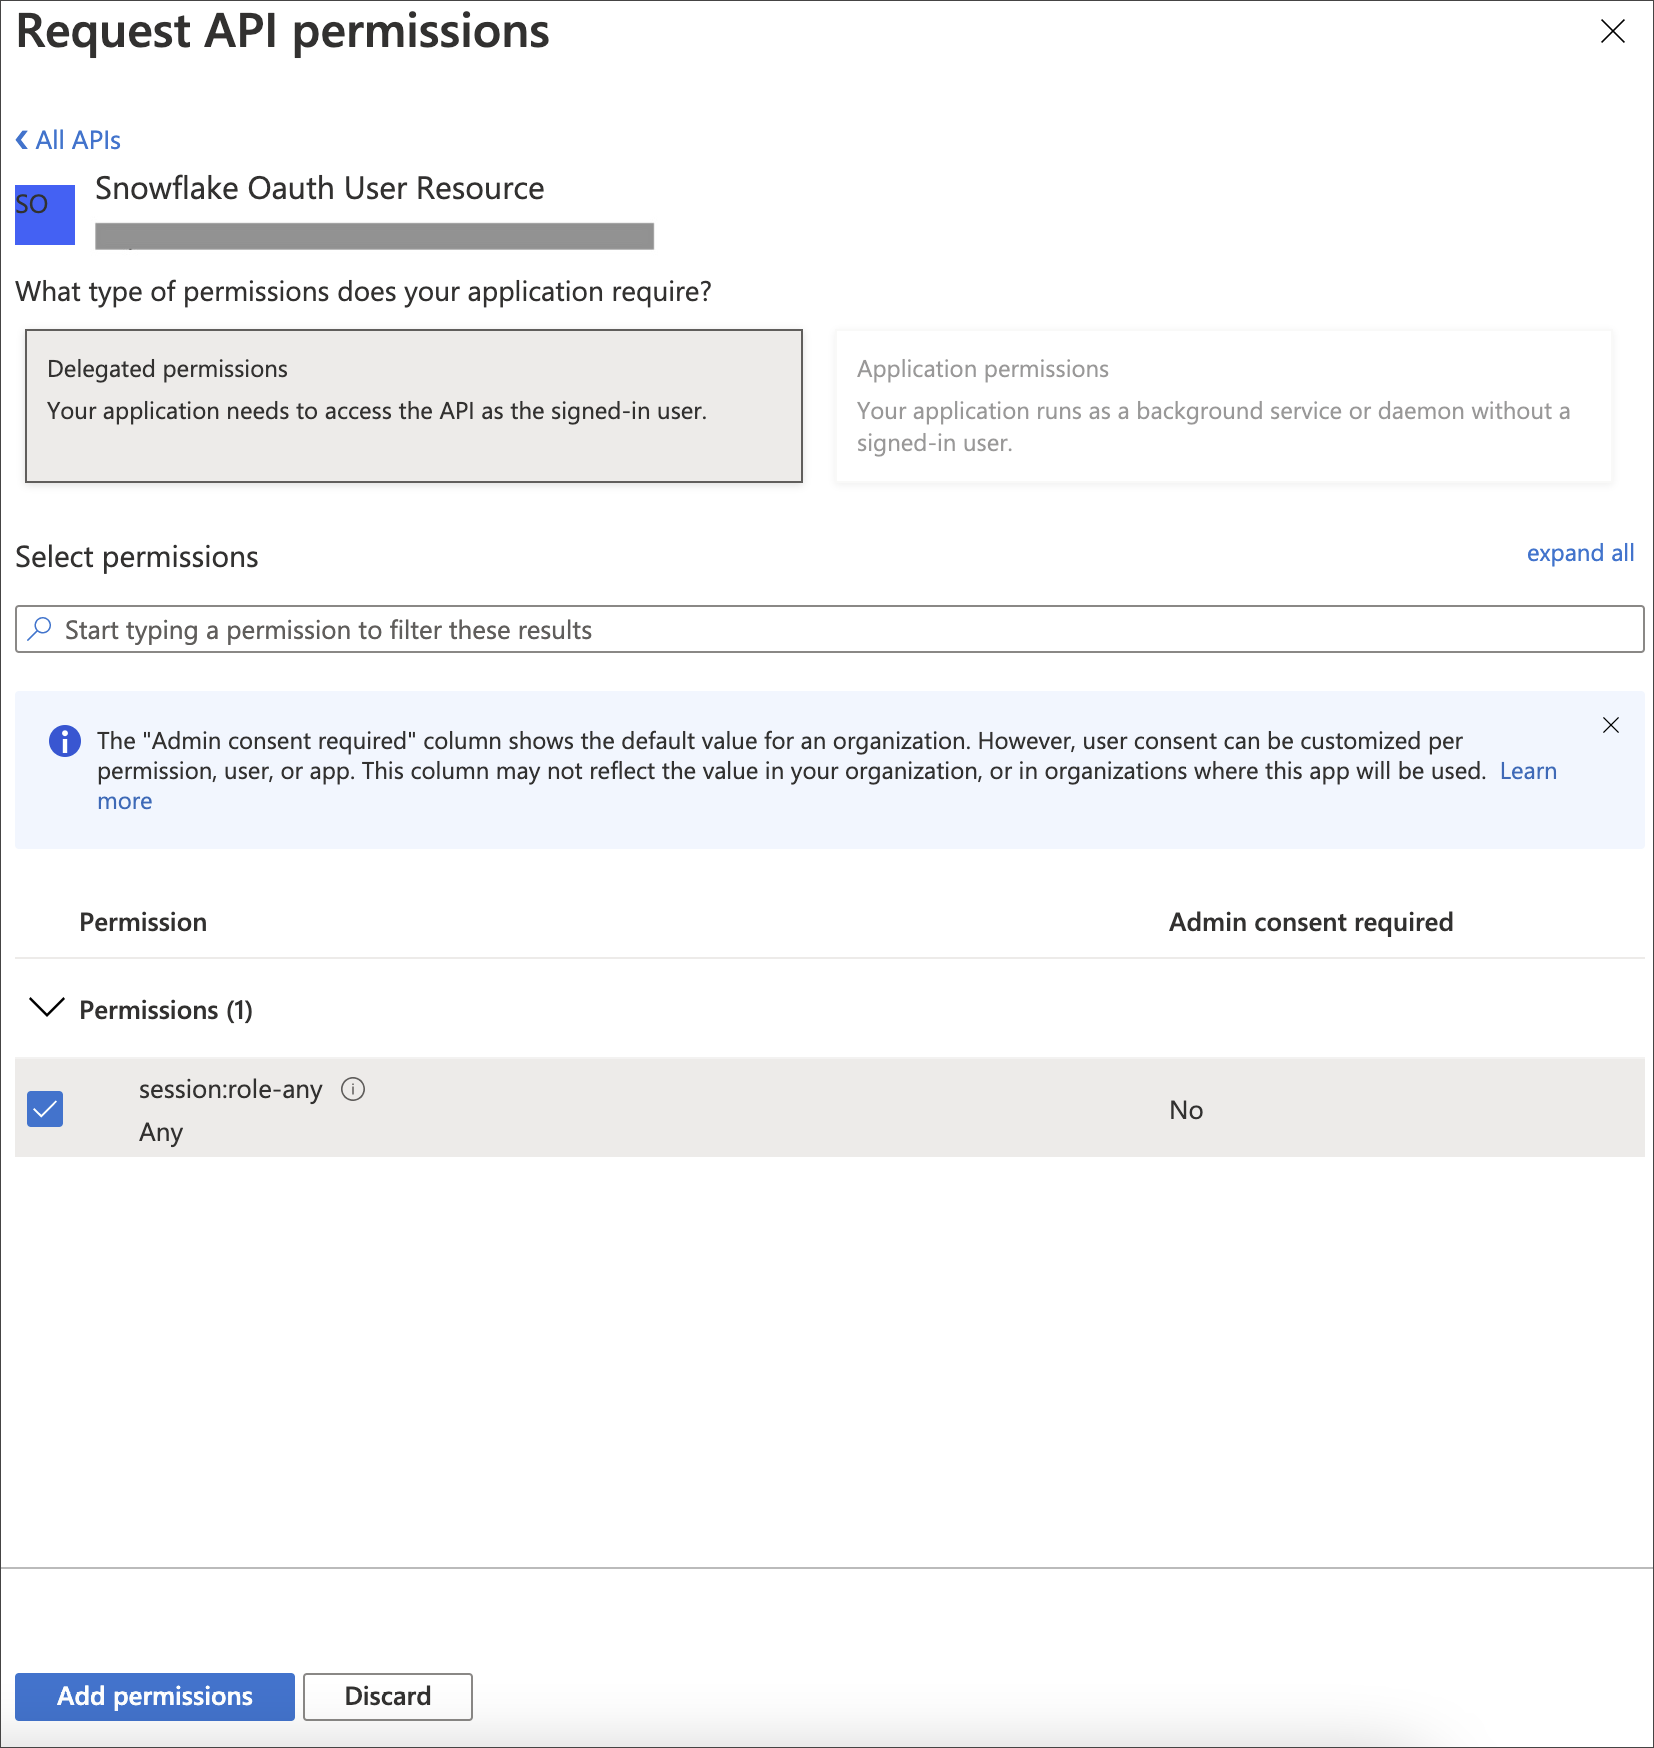
-
On the Request API permissions page, click the Delegated permissions box, and select the permission related to scope you defined in the application you want to grant to this client.
-
Click Add permissions.
-
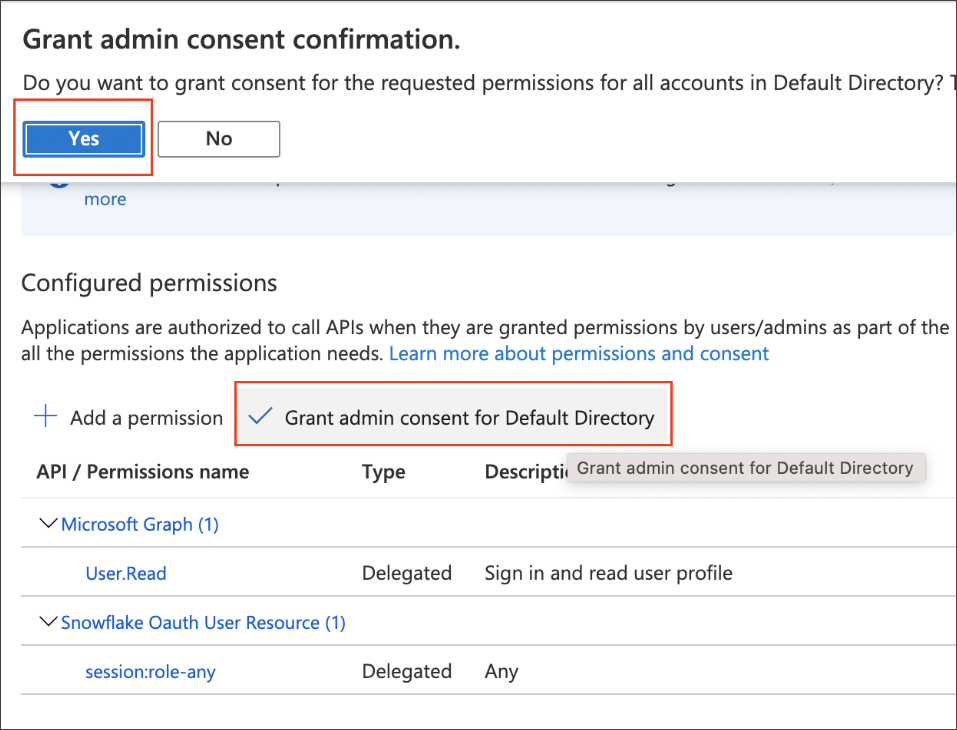
Under Configured permissions, click Grant admin consent for Default Directory, and then click Yes in the confirmation message.
Part 3: Collecting Azure AD information for Snowflake
To collect Azure AD information for Snowflake, do the following:
-
Sign in to the Microsoft Azure Portal, and navigate to Azure Active Directory, if needed.
-
Go back to the Snowflake OAuth Resource App (Snowflake Oauth User Resource) to collect all the info related as mentioned below:
a. Click Endpoints in the Overview interface.
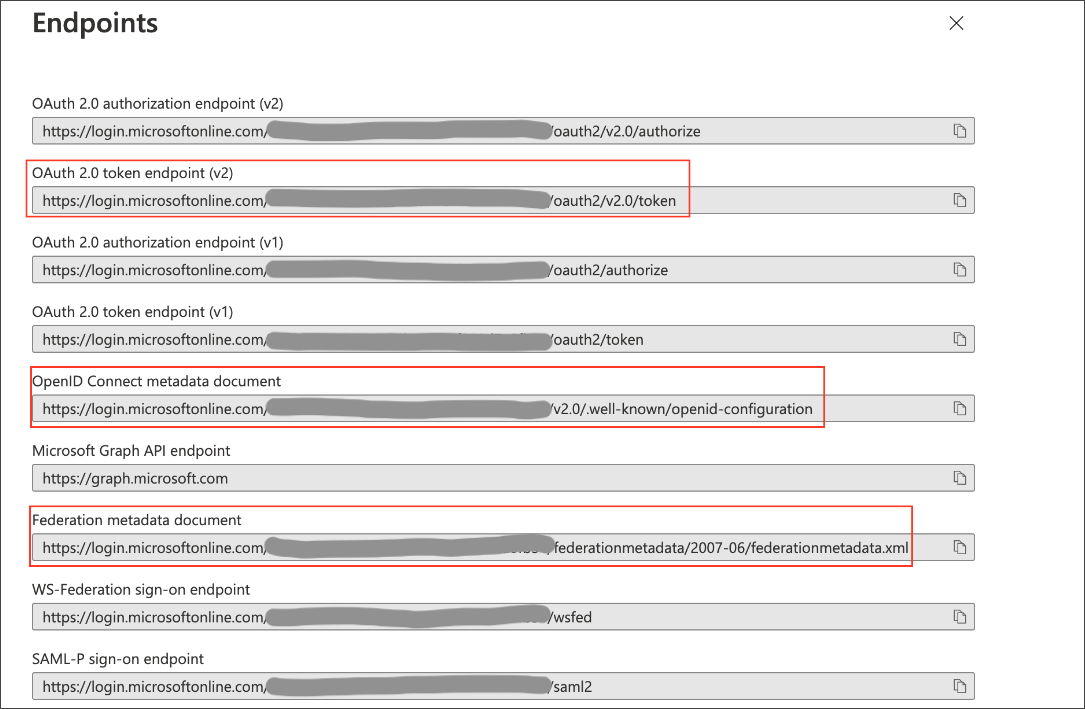
b. On the right-hand side, copy the OAuth 2.0 token endpoint (v2) and note the URLs for OpenID Connect metadata and Federation Connect metadata.
-
The OAuth 2.0 token endpoint (v2) is referred to as the
<AZURE_AD_OAUTH_TOKEN_ENDPOINT>in the following configuration steps. The endpoint should be similar tohttps://login.microsoftonline.com/<tenant_id>/oauth2/v2.0/token/. -
For the OpenID Connect metadata, open in a new browser window.
a. Locate the “jwks_uri” parameter and copy its value.
b. This parameter value will be known as the
<AZURE_AD_JWS_KEY_ENDPOINT>in the following configuration steps. The endpoint should be similar tohttps://login.microsoftonline.com/<tenant_id>/discovery/v2.0/keys.
-
-
For the Federation metadata document, open the URL in a new browser window.
a. Locate the
"entityID"parameter in theXML Root Elementand copy its value.b. This parameter value will be known as the
<AZURE_AD_ISSUER>in the following configuration steps. The entityID value should be similar tohttps://sts.windows.net/<tenant_id>/. -
The OAuth 2.0 authorization endpoint (v2) should be similar to
https://login.microsoftonline.com/<tenant_id>/oauth2/v2.0/authorize.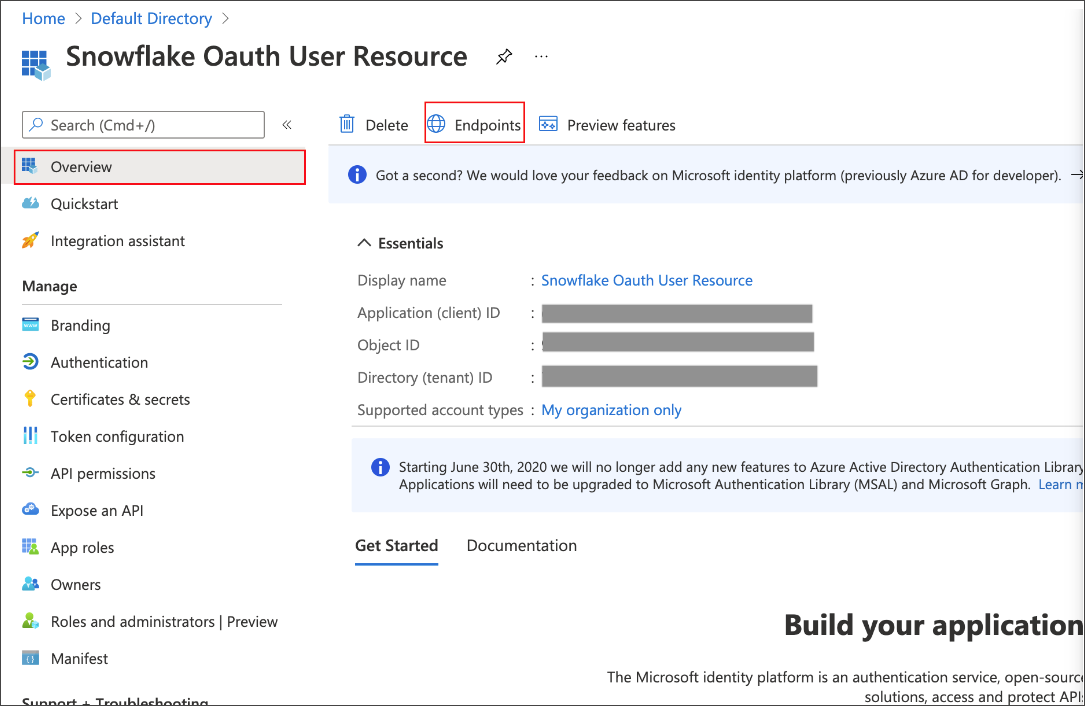
Part 4: Creating an OAuth authorization server in Snowflake
In this part you must do the following:
- Create a security integration in Snowflake to ensure that Snowflake can securely communicate with Microsoft Azure AD.
- Validate the tokens from Azure AD.
- Provide the appropriate Snowflake data access to users based on the user role associated with the OAuth token.
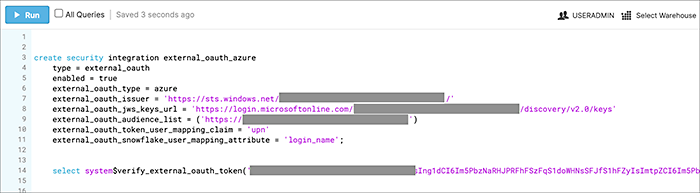
Security integration format
create security integration external_oauth_azure_2
    type = external_oauth
    enabled = true
    external_oauth_type = azure
    external_oauth_issuer = '<AZURE_AD_ISSUER>'
    external_oauth_jws_keys_url = '<AZURE_AD_JWS_KEY_ENDPOINT>'
    external_oauth_audience_list = ('<SNOWFLAKE_APPLICATION_ID_URI>')
    external_oauth_token_user_mapping_claim = 'upn'
    external_oauth_any_role_mode = 'ENABLE' (optional)
    external_oauth_snowflake_user_mapping_attribute = 'login_name';
Example:
Application ID URI that is not the Snowflake Account URL (i.e. <account_identifier>.snowflakecomputing.com), you must add the external_oauth_audience_list parameter to the command with the value <SNOWFLAKE_APPLICATION_ID_URI>.Snowflake commands
Create user as Azure AD user
CREATE USER testuser PASSWORD = '' LOGIN_NAME = 'testuser@thoughtspot.com' DISPLAY_NAME = 'AD_TEST_USER';
Validate access token
select system$verify_external_oauth_token('<ACCESS_TOKEN>');
Grant sysadmin role to TESTUSER
GRANT ROLE sysadmin TO USER TESTUSER;
Altering user
ALTER USER testuser SET DEFAULT_ROLE = SYSADMIN;
(Optional) Validating your Azure configuration
To ensure your Azure configuration is correct for use with ThoughtSpot, you can generate an access token.
You can use either of the following methods to generate your access token:
- Postman
- cURL
Method 1: Postman
To validate your configuration using Postman, do the following:
-
Sign in to Postman.
-
Go to the Authorization tab.
-
For Token Name, enter a token name.
-
For Grant Type, select Authorization Code from the menu.
-
For Callback URL, select Authorize using browser.
This should be defined in your OAuth User app(Ex: Snowflake OAuthUser). The default is
https://oauth.pstmn.io/v1/callback. -
For Auth URL, enter the OAuth 2.0 authorization endpoint (v2) value from “Endpoints” in the app.
Example:
https://login.microsoftonline.com/<tenant_id>/oauth2/v2.0/authorize -
For Access Token URL, enter the access token URL.
Example:
https://login.microsoftonline.com/<tenant_id>/oauth2/v2.0/token/ -
For Scope, you must provide “offline_access” as the scope, along with the actual scope. The refresh token is only provided if the offline_access scope was requested.
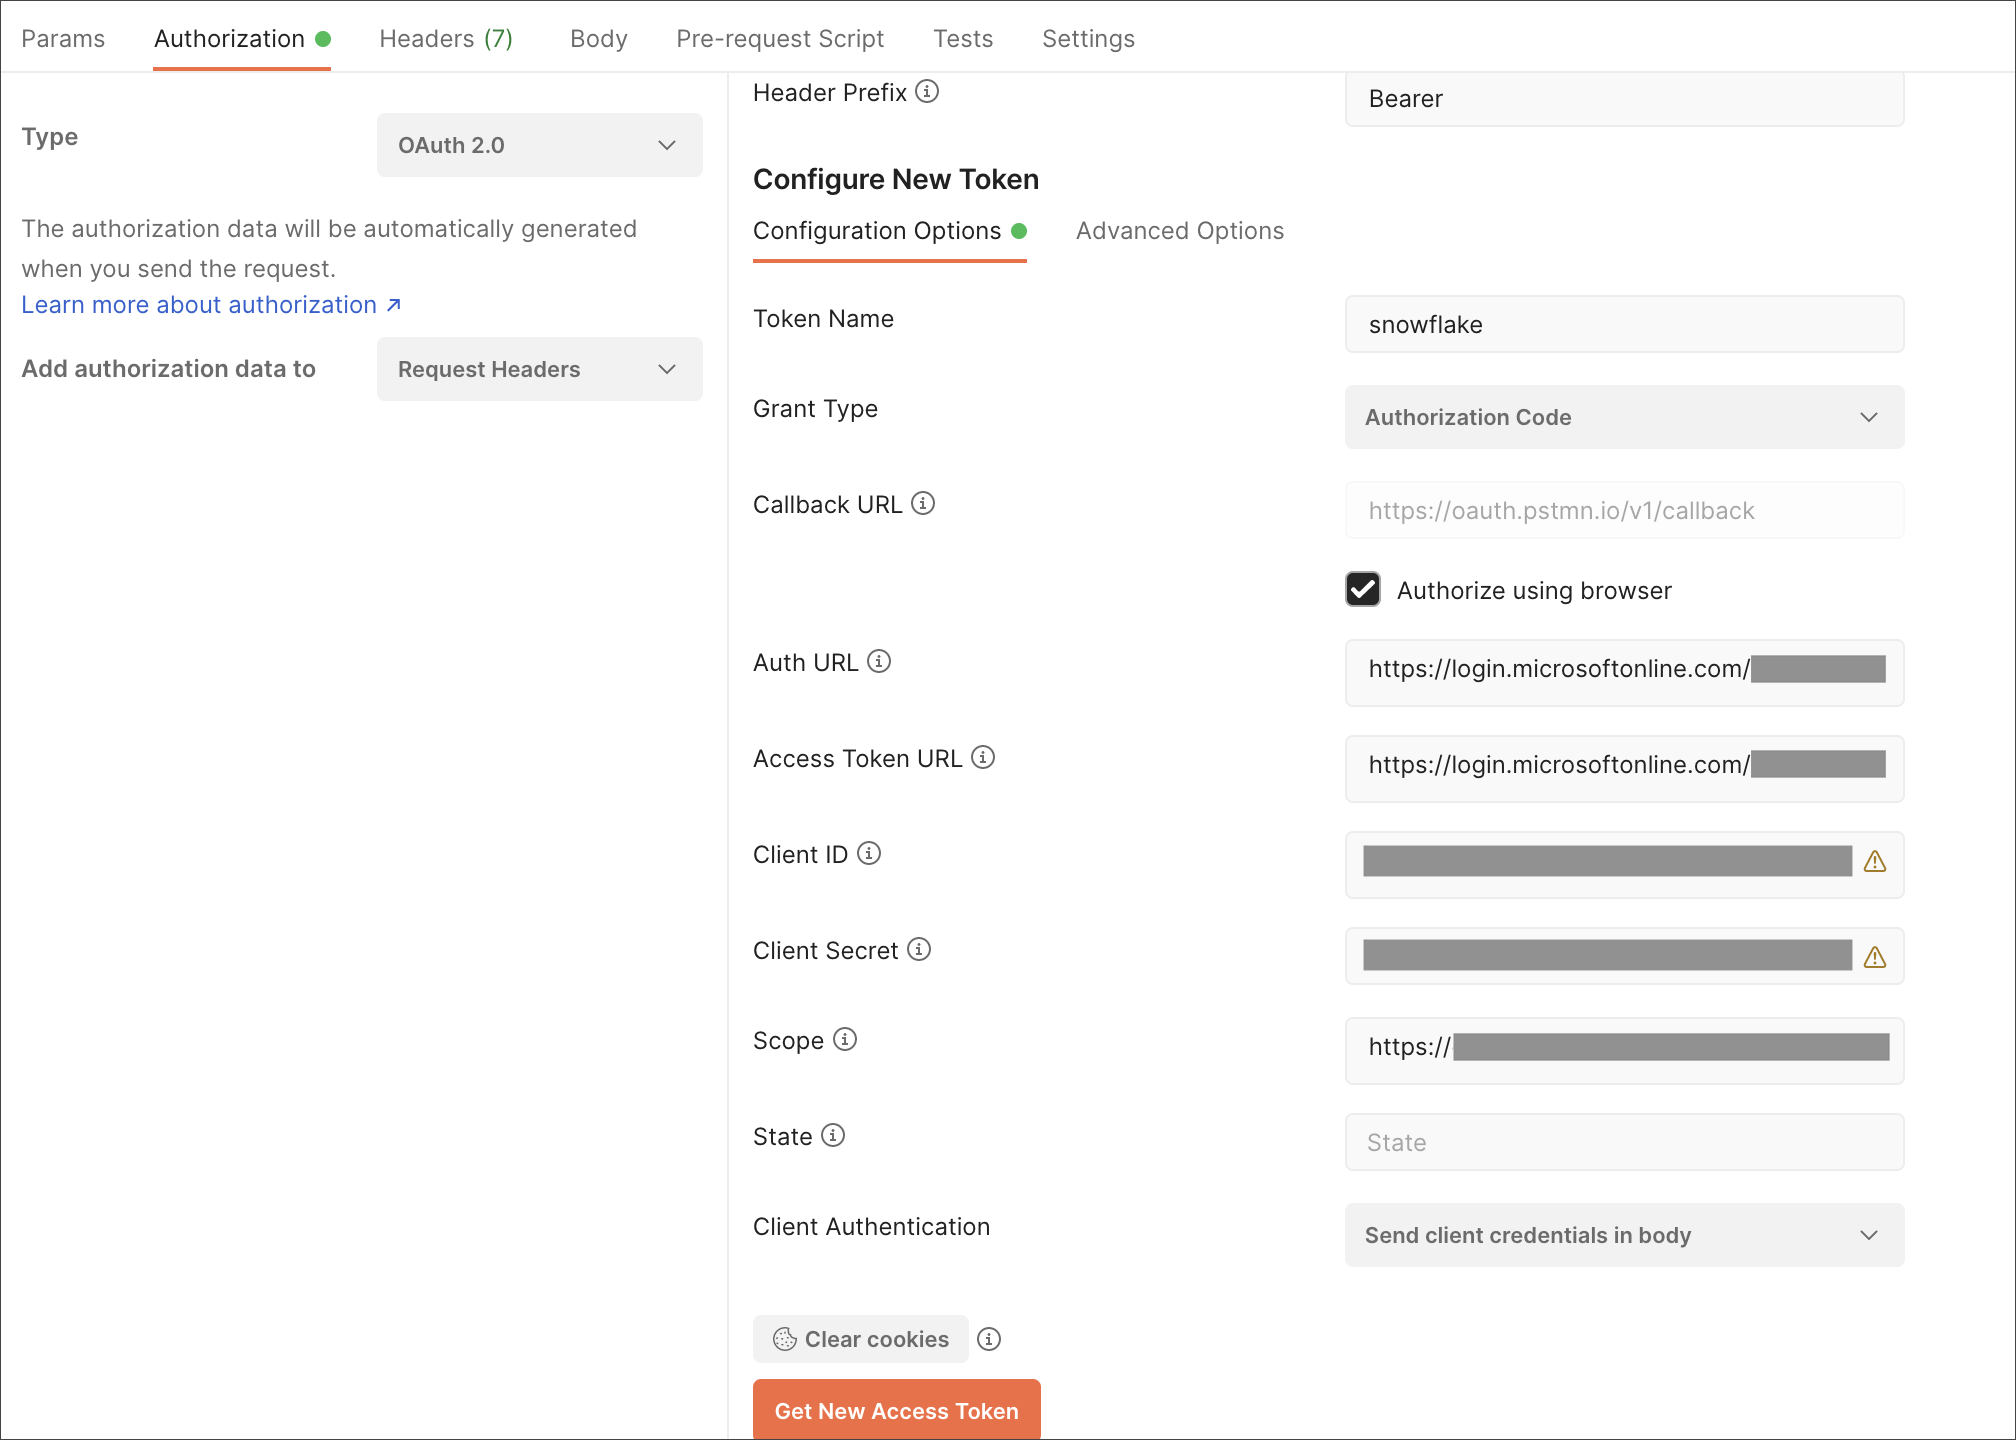
Example:
https://<application_id>/session:role-any offline_accessImportant: When you create the scope in the Azure AD application setup, it must be set as “any” so that a user can later switch to any of his allowed roles when making a JDBC connection using the obtained token. -
Click Get New Access Token.
-
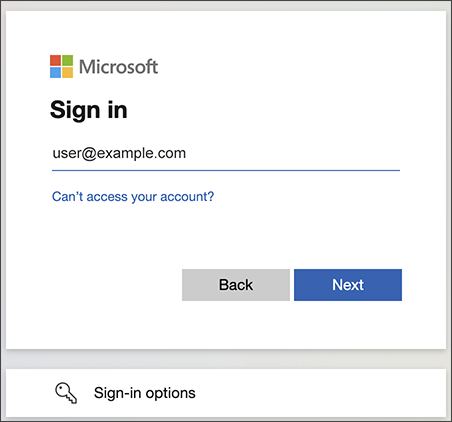
Sign in to your Microsoft Azure account.
-
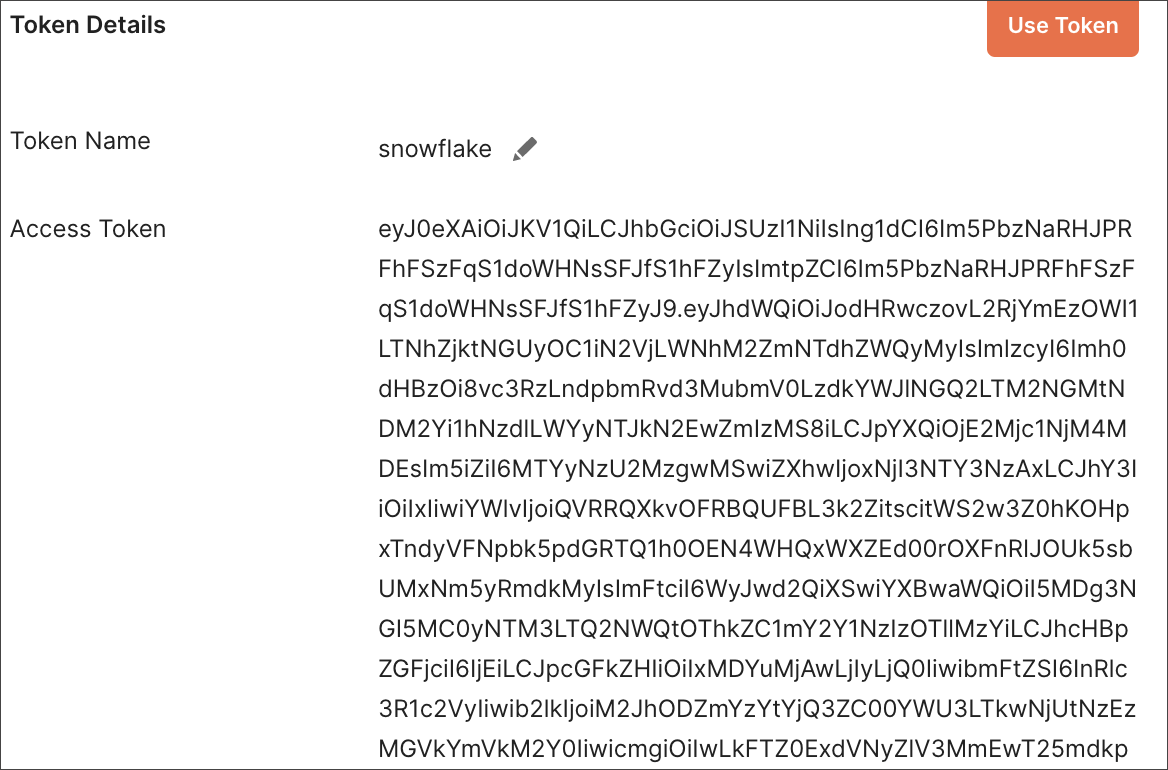
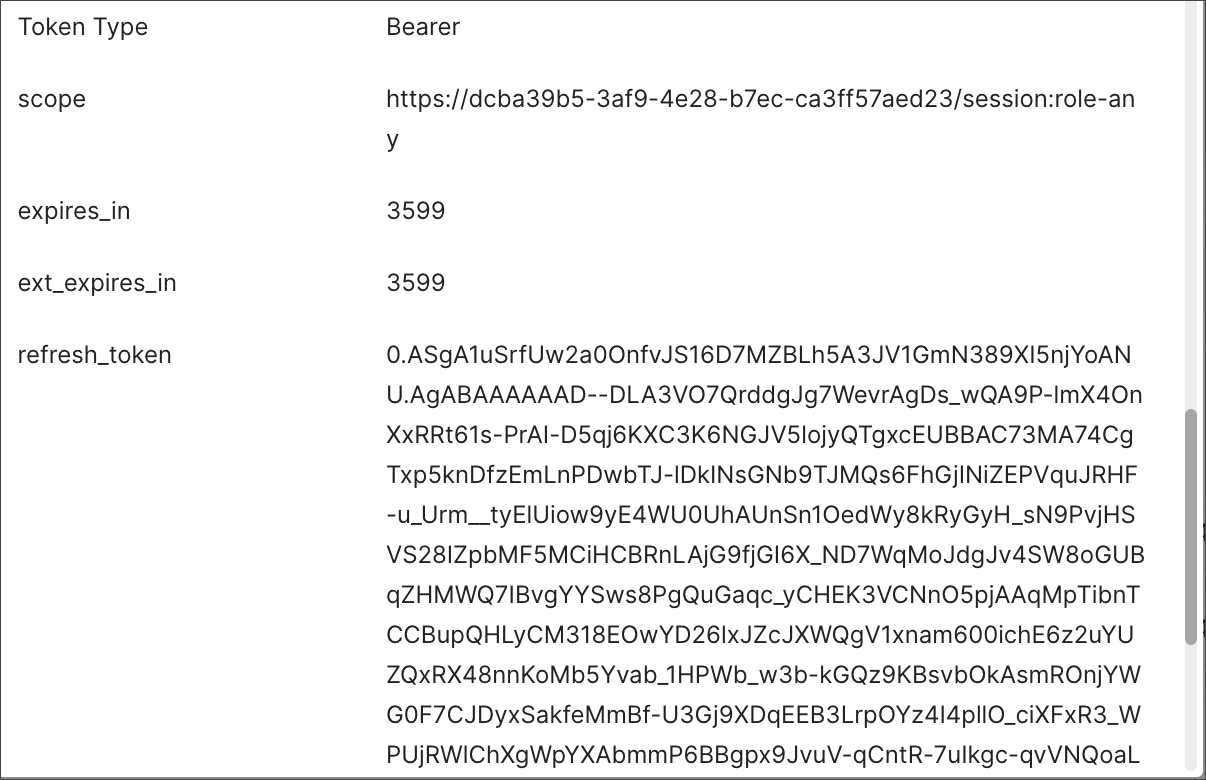
On the Token Details page, click Use Token.
Method 2: cURL
To validate your configuration using cURL, do the following:
-
Execute below command to get access token with password grant_type:
 curl -X POST -H "Content-Type: application/x-www-form-urlencoded;charset=UTF-8" \
   --data-urlencode "client_id=<OAUTH_CLIENT_ID>" \
   --data-urlencode "client_secret=<OAUTH_CLIENT_SECRET>" \
   --data-urlencode "username=<AZURE_AD_USER>" \
   --data-urlencode "password=<AZURE_AD_USER_PASSWORD>" \
   --data-urlencode "grant_type=password" \
   --data-urlencode "scope=<SCOPE_AS_IT_APPEARS_IN_AZURE_APP>" \
   '<AZURE_AD_OAUTH_TOKEN_ENDPOINT>'
Example:
 curl -X POST -H "Content-Type: application/x-www-form-urlencoded;charset=UTF-8" \
 --data-urlencode "client_id=<client_id>" \
 --data-urlencode "client_secret=<client_secret>" \
 --data-urlencode "username=testuser@thoughtspot.com" \
 --data-urlencode "password=*****" \
 --data-urlencode "grant_type=password" \
 --data-urlencode "scope=https://<application_id>/session:role-any offline_access"\
 `https://login.microsoftonline.com/ <tenant_id>/oauth2/v2.0/token'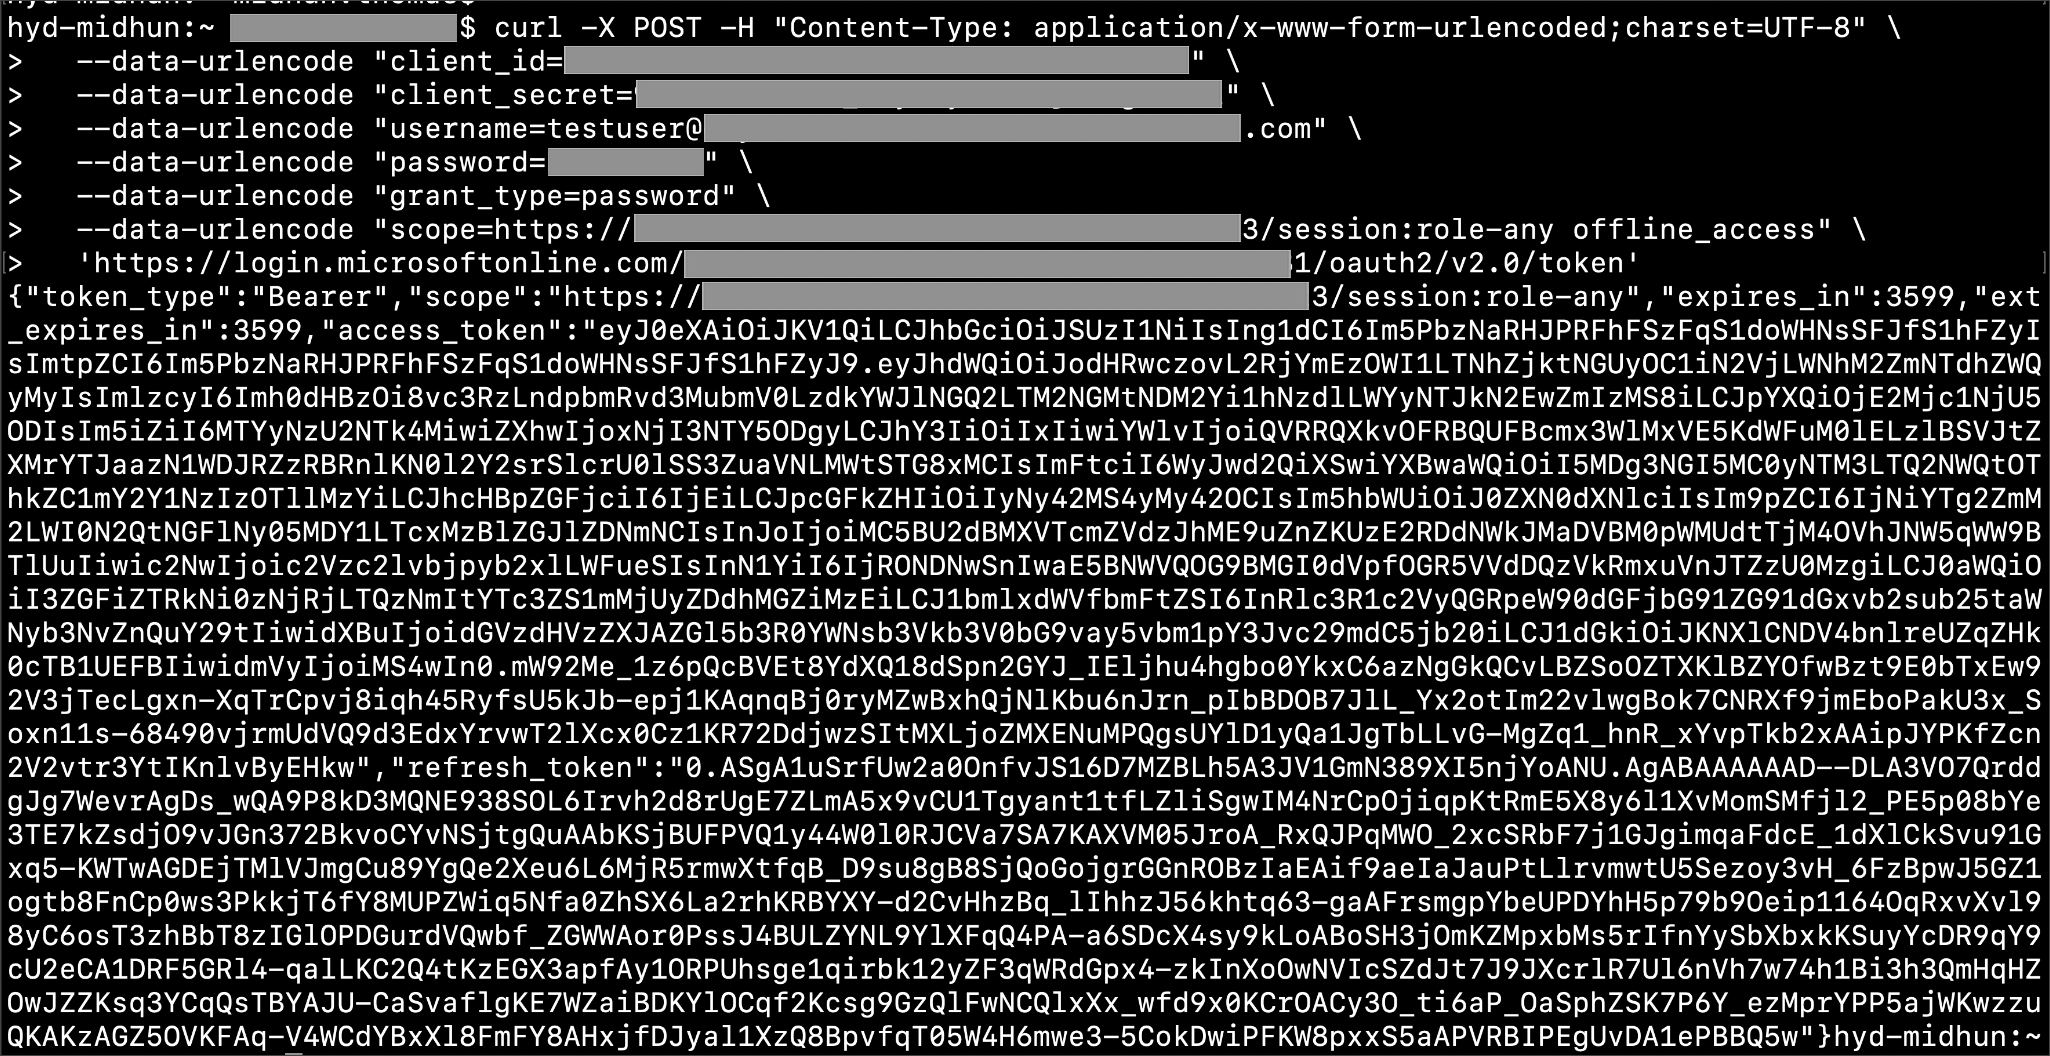
-
Execute below command for getting access token with refresh_token as grant_type:
 curl -X POST -H "Content-Type: application/x-www-form-urlencoded;charset=UTF-8" \
   --data-urlencode "client_id=<client_id>" \
   --data-urlencode "client_secret=<client_secret>" \
     --data-urlencode "grant_type=refresh_token" \
     --data-urlencode "refresh_token=<Replace_Refresh_Token>" \
     --data-urlencode "scope=https://<application_id>/session:role-any offline_access" \
   'https://login.microsoftonline.com/<tenant_id>/oauth2/v2.0/token'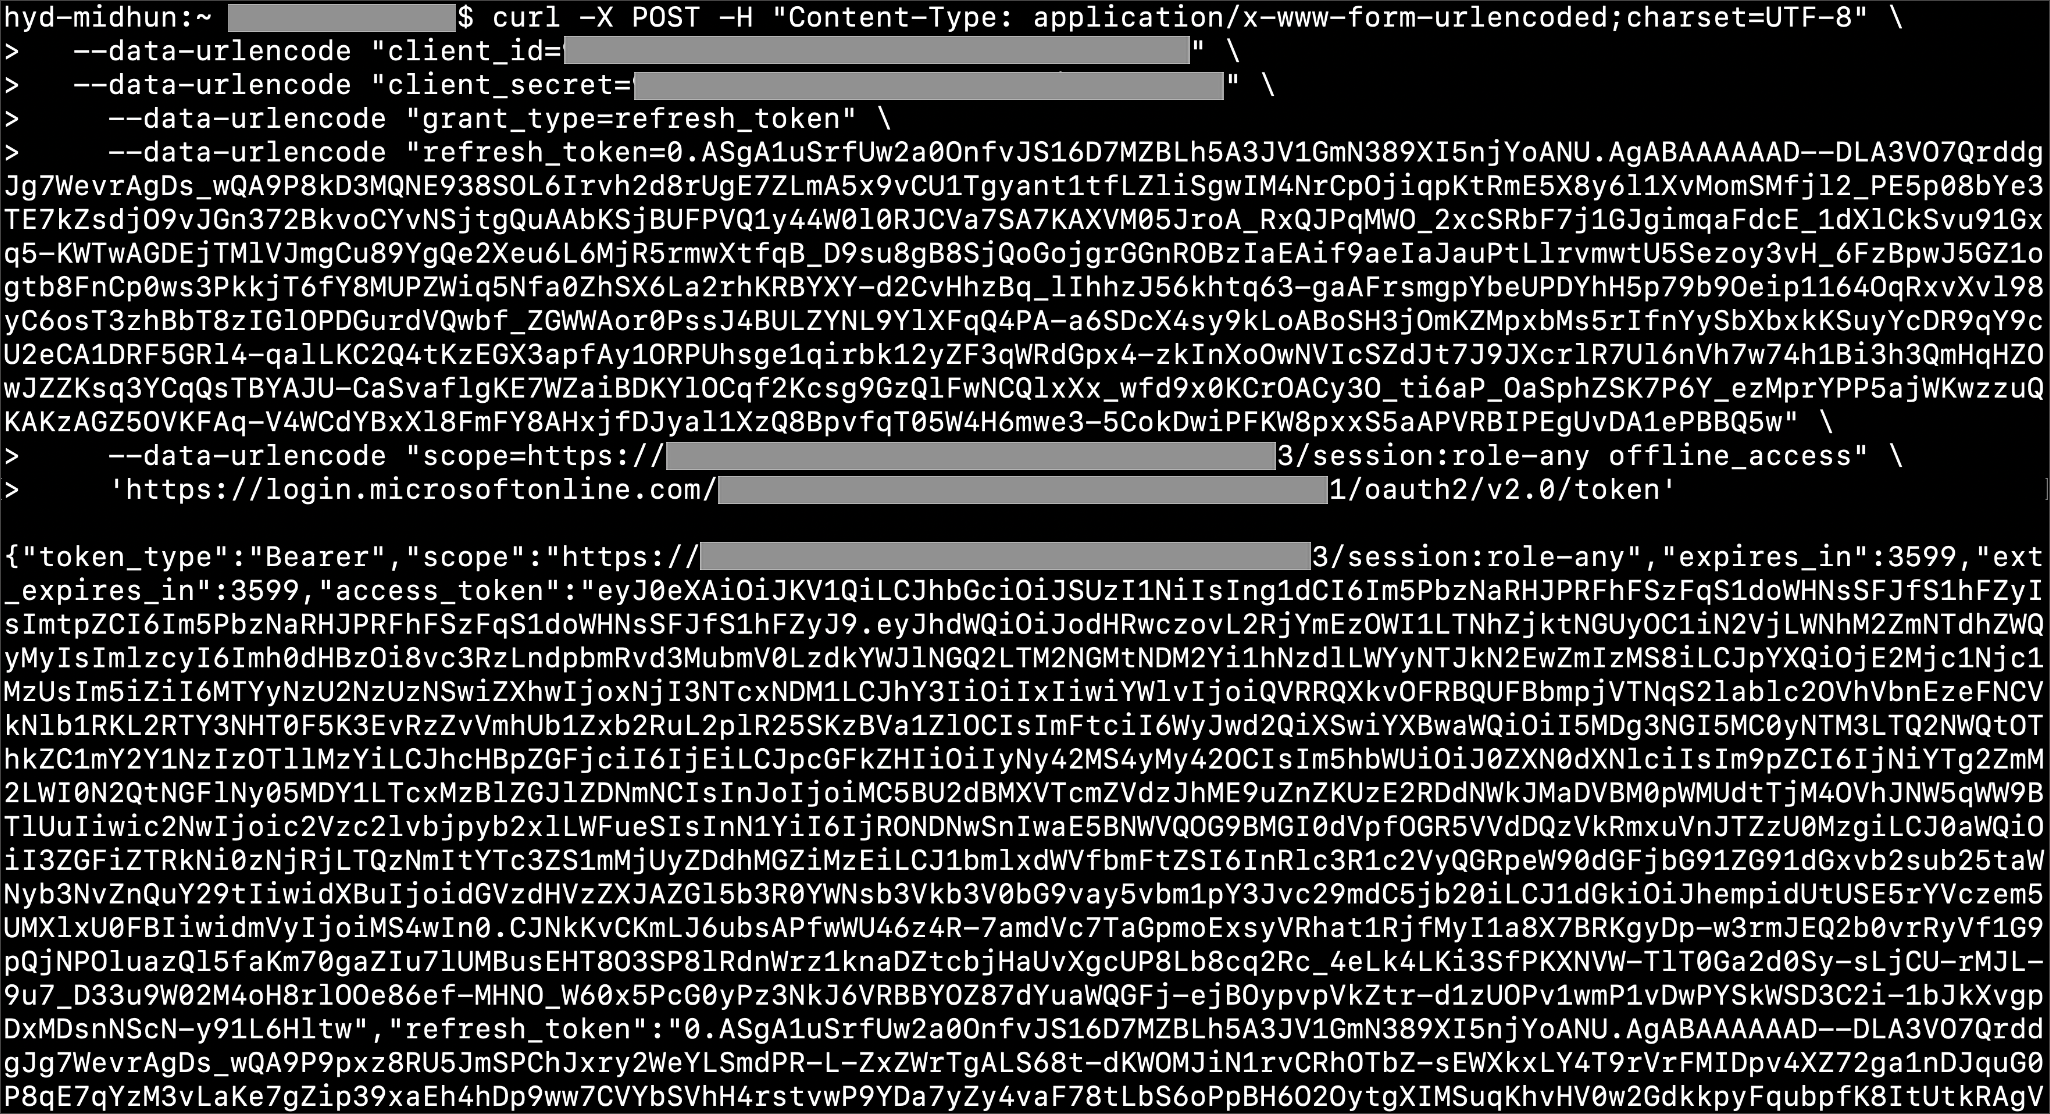
Related links
- Configure Microsoft Azure AD for External OAuth
- How to: create external OAuth token using Azure AD for the OAuth client itself
- How to: create external OAuth token using Azure AD on behalf of the user
- How to: create security integration & user to use with OAuth client token with Azure AD
- JSON web token debugger